The following doesn't seem to do anything.
ng serve --ssl true --ssl-key <key-path> --ssl-cert <cert-path> Creating the Certificate and key by providing them in the default ssl directory still does nothing.
It looks like ng server is completely ignoring the --ssl parameter and keeps saying NG Live Development Server is running on
11 Answers
Angular CLI 6+
I've updated my own projects so I figured I can now update this answer too.
You'll now put the path to your key and certificate in your angular.json file as follows:
{ "$schema": "./node_modules/@angular/cli/lib/config/schema.json", "projects": { "<PROJECT-NAME>": { "architect": { "serve: { "options": { "sslKey": "<relative path from angular.json>/server.key", "sslCert": "<relative path from angular.json>/server.crt", ... }, ... }, ... }, ... }, ... }, ... } And then you can run:
ng serve --ssl If you want SSL on by default then you should add a "ssl": true, option immediately below the sslKey and sslCert.
You can find the angular.json schema at the Angular CLI documentation.
Old answer for Angular CLI 1.0.0+.
Angular-CLI now works with the SSL options. Like you've noted, you can manually select which key and cert you'd like to use with the command:
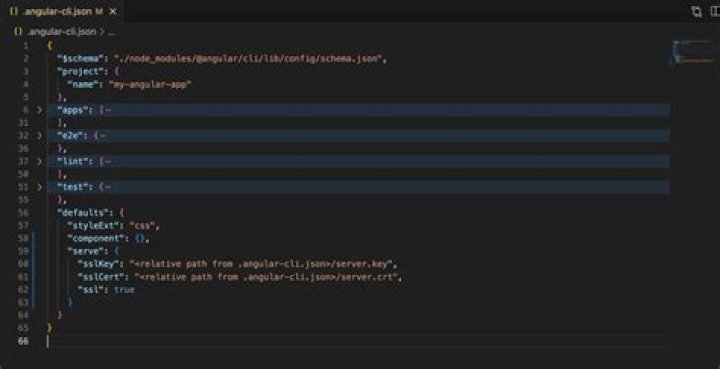
ng serve --ssl --ssl-key <key-path> --ssl-cert <cert-path> If you'd like to set a default path for your key and cert then you can go into your .angular-cli.json file adjust the Defaults section accordingly:
{ "$schema": "./node_modules/@angular/cli/lib/config/schema.json", "defaults": { "serve": { "sslKey": "<relative path from .angular-cli.json>/server.key", "sslCert": "<relative path from .angular-cli.json>/server.crt", ... }, ... }, ... } And then you can run:
ng serve --ssl If you want SSL on by default then you should add a "ssl": true, option immediately below the sslKey and sslCert.
3You can use
--ssl or
"serve": { "builder": "@angular-devkit/build-angular:dev-server", "options": { "browserTarget": "someapp:build", "ssl": true }, and an ssl cert will automatically be generated for you.
Then for Chrome to accept a self signed cert for localhost, set this flag: chrome://flags/#allow-insecure-localhost
You'll also need to import the cert into your Trusted Root Certificates. To do this, click the cert error at top in Chrome then:
- Click
certificate (invalid) - Click the
Detailstab - Click
Copy to File... - next next finish and export it somewhere.
- start-> run->
inetcpl.cpl - click
Contenttab - click
Certificates - click
Trusted Root Certication Authoritiestab - Click
Importbutton - Import the cert
- Re-run
ng serve --ssl
Be aware, the cert only lasts one month. At the end of that month you'll struggle to find a solution but I've already been through this and here is the fix
3JFYI, in Angular6 you have to put the conf in the options (in angular.json) :
"serve": { "builder": "@angular-devkit/build-angular:dev-server", "options": { "browserTarget": "app:build", "ssl": true, "sslKey": "path to .key", "sslCert": "path to .crt" }, ... } Very simple solution from this page
npm install browser-sync --save-dev And then
ng serve --ssl true --ssl-key /node_modules/browser-sync/lib/server/certs/server.key --ssl-cert /node_modules/browser-sync/lib/server/certs/server.crt Quick and bold) Just used it in my angular cli 6.2.3 project
3If you don't want to go for configurations just add --ssl
ng serve --ssl Perfectly working, it will automatically create a certificate for you. Tested on chrome browser. It says "not trusted connection", but just proceed.
Hope this helps
1To complement this solution, if you ever wonder how to generate key and certificate for localhost, here is a great step by step article about it:
1IF you want to create your own certificate and add to the trusted keychain in MAC
We’ll be using OpenSSL to generate all of our certificates.
Step 1: Root SSL certificate
Step 2: Trust the root SSL certificate
Step 3: Domain SSL certificate
Step 4: Use your new SSL certificate
# Step 1: Root SSL certificate openssl genrsa -des3 -out rootCA.key 2048 openssl req -x509 -new -nodes -key rootCA.key -sha256 -days 1024 -out rootCA.pem 
# Step 2: Trust the root SSL certificate Before you can use the newly created Root SSL certificate to start issuing domain certificates, there’s one more step. You need to to tell your Mac to trust your root certificate so all individual certificates issued by it are also trusted.
Keychain Access on your Mac and go to the Certificates category in your System keychain. Once there, import the rootCA.pem using File > Import Items. Double click the imported certificate and change the “When using this certificate:” dropdown to Always Trust in the Trust section.
Your certificate should look something like this inside Keychain Access if you’ve correctly followed the instructions till now.
# Step 3: Domain SSL certificate The root SSL certificate can now be used to issue a certificate specifically for your local development environment located at localhost.
Create a new OpenSSL configuration file server.csr.cnf so you can import these settings when creating a certificate instead of entering them on the command line.
[req] default_bits = 2048 prompt = no default_md = sha256 distinguished_name = dn [dn] C=US ST=RandomState L=RandomCity O=RandomOrganization OU=RandomOrganizationUnit emailAddress= CN = localhost Create a v3.ext file in order to create a X509 v3 certificate. Notice how we’re specifying subjectAltName here.
authorityKeyIdentifier=keyid,issuer basicConstraints=CA:FALSE keyUsage = digitalSignature, nonRepudiation, keyEncipherment, dataEncipherment subjectAltName = @alt_names [alt_names] DNS.1 = localhost Create a certificate key for localhost using the configuration settings stored in server.csr.cnf. This key is stored in server.key.
openssl req -new -sha256 -nodes -out server.csr -newkey rsa:2048 -keyout server.key -config <( cat server.csr.cnf ) A certificate signing request is issued via the root SSL certificate we created earlier to create a domain certificate for localhost. The output is a certificate file called server.crt.
openssl x509 -req -in server.csr -CA rootCA.pem -CAkey rootCA.key -CAcreateserial -out server.crt -days 500 -sha256 -extfile v3.ext
# Step 4 Use your new SSL certificate You’re now ready to secure your localhost with HTTPS. Move the server.key and server.crt files to an accessible location on your server and include them when starting your server.
"serve": { "builder": "@angular-devkit/build-angular:dev-server", "options": { "browserTarget": "project-falcon:build", "ssl": true, "sslKey": "src/assets/sslcertificate/server.key", "sslCert": "src/assets/sslcertificate/server.crt" } } Clear the cache in Google chrome and restart the browser, also delete the cache and temp files in mac
Now we can use ng serve -o
Reference
You are correct. The current implementation does not take the ssl configuration options under account. I have created a pull request that fixes this issue. However it has not been merged yet in the master at the time of this writing.
2Angular CLI 1.0.0+.
ng serve --ssl 1 --ssl-key {{key-path}} --ssl-cert {{cert-path}}
Angular CLI 6+
ng serve --ssl true --sslKey {{key-path}} --sslCert {{cert-path}}
Change the values in {{*-path}}, to the corresponding values.
It always advisable to provide the cert and ports to server team. They configure in server level. This way always good for production code.
The team will configure Cert and DNS mapping with domain.
so it turn in to app domainname:your choosen port/
Just spent days on this Angular -- node API over SSL, you can see my solution at this SO post