I wrote the following code to normalize an image using NORM_L1 in OpenCV. But the output image was just black. How to solve this?
import cv2 import numpy as np import Image img = cv2.imread('img7.jpg') gray_image = cv2.cvtColor(img,cv2.COLOR_BGR2GRAY) a = np.asarray(gray_image) dst = np.zeros(shape=(5,2)) b=cv2.normalize(a,dst,0,255,cv2.NORM_L1) im = Image.fromarray(b) im.save("img50.jpg") cv2.waitKey(0) cv2.destroyAllWindows() 3 Answers
If you want to change the range to [0, 1], make sure the output data type is float.
image = cv2.imread("lenacolor512.tiff", cv2.IMREAD_COLOR) # uint8 image norm_image = cv2.normalize(image, None, alpha=0, beta=1, norm_type=cv2.NORM_MINMAX, dtype=cv2.CV_32F) When you normalize a matrix using NORM_L1, you are dividing every pixel value by the sum of absolute values of all the pixels in the image. As a result, all pixel values become much less than 1 and you get a black image. Try NORM_MINMAX instead of NORM_L1.
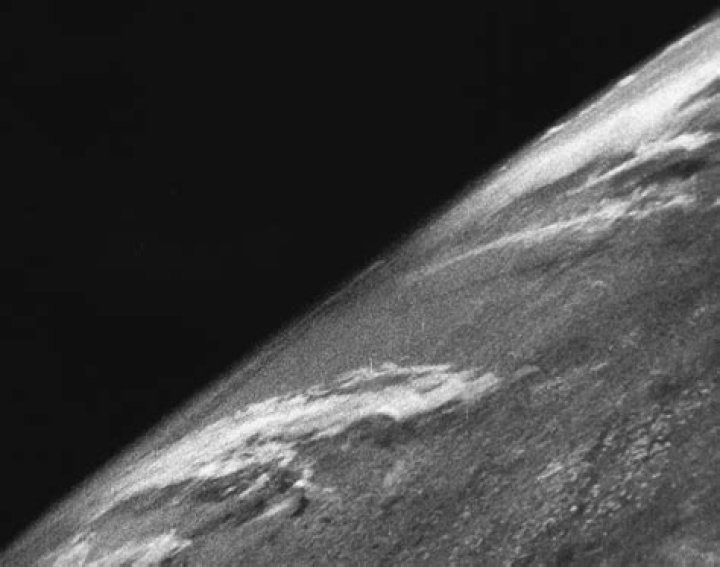
3The other answers normalize an image based on the entire image. But if your image has a predominant color (such as black), it will mask out the features that you're trying to enhance since it will not be as pronounced. To get around this limitation, we can normalize the image based on a subsection region of interest (ROI). Essentially we will normalize based on the section of the image that we want to enhance instead of equally treating each pixel with the same weight. Take for instance this earth image:
Input image -> Normalization based on entire image

If we want to enhance the clouds by normalizing based on the entire image, the result will not be very sharp and will be over saturated due to the black background. The features to enhance are lost. So to obtain a better result we can crop a ROI, normalize based on the ROI, and then apply the normalization back onto the original image. Say we crop the ROI highlighted in green:
This gives us this ROI
The idea is to calculate the mean and standard deviation of the ROI and then clip the frame based on the lower and upper range. In addition, we could use an offset to dynamically adjust the clip intensity. From here we normalize the original image to this new range. Here's the result:
Before -> After
Code
import cv2 import numpy as np # Load image as grayscale and crop ROI image = cv2.imread('1.png', 0) x, y, w, h = 364, 633, 791, 273 ROI = image[y:y+h, x:x+w] # Calculate mean and STD mean, STD = cv2.meanStdDev(ROI) # Clip frame to lower and upper STD offset = 0.2 clipped = np.clip(image, mean - offset*STD, mean + offset*STD).astype(np.uint8) # Normalize to range result = cv2.normalize(clipped, clipped, 0, 255, norm_type=cv2.NORM_MINMAX) cv2.imshow('image', image) cv2.imshow('ROI', ROI) cv2.imshow('result', result) cv2.waitKey() The difference between normalizing based on the entire image vs a specific section of the ROI can be visualized by applying a heatmap to the result. Notice the difference on how the clouds are defined.
Input image -> heatmap
Normalized on entire image -> heatmap
Normalized on ROI -> heatmap
Heatmap code
import matplotlib.pyplot as plt import numpy as np import cv2 image = cv2.imread('result.png', 0) colormap = plt.get_cmap('inferno') heatmap = (colormap(image) * 2**16).astype(np.uint16)[:,:,:3] heatmap = cv2.cvtColor(heatmap, cv2.COLOR_RGB2BGR) cv2.imshow('image', image) cv2.imshow('heatmap', heatmap) cv2.waitKey() Note: The ROI bounding box coordinates were obtained using how to get ROI Bounding Box Coordinates without Guess & Check and heatmap code was from how to convert a grayscale image to heatmap image with Python OpenCV
1